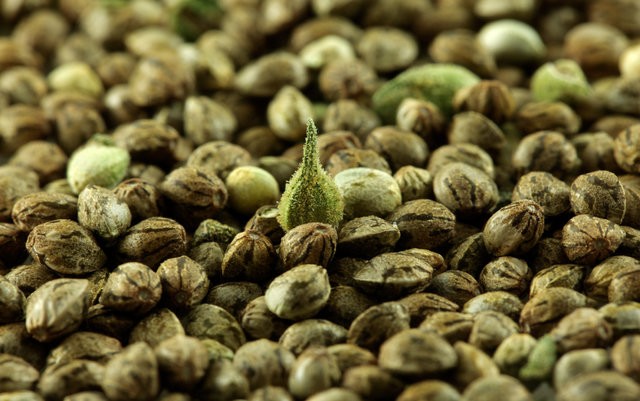
Alright guys and gals, class is now in session, welcome to Germination 420 (cause 101 isn’t enough)! Before we get too far into it, I want to make sure that everybody has the one thing that is of utmost importance. “A joint!” What? No, ya stoners. I’m talking about a healthy, viable seed. If you bought your seeds from a reputable source, then chances are you’re good to go (no guarantees though, so keep reading). Maybe you’ve found yourself with a pile of “bag seeds” though and have decided to start with those. Don’t be ashamed! The very first plant I ever grew was from a baggie of seeds stashed away in a sock drawer and it was great.
So lay your seeds out in front of you and begin inspecting them. For what exactly? Easiest way to spot a bunk seed is to look at the color. See all those dull whiteish and pale tan ones that, when you really think about it, look unhealthy and underdeveloped? Toss them, eat them, compost them, do whatever you want with them as long as it’s not trying to germinate. A healthy marijuana seed is going to look like the ones in the photo at the top of this post. They’re dark brown, striped and have a healthy oily sheen. In my opinion, it should go without saying that cracked, chipped or split seeds should be avoided. There are some that claim to have gotten a lightly damaged seed to germinate. That’s cool and all, but if you have perfect seeds to work with then just use those.
Now that everyone is sure they have a viable marijuana seed, let’s discuss what germination even is. Don’t worry, I’ll stick to the basics and quickly move on to what you really came here for. However, if you do want to learn or talk about germination in a more technical way then head over to the comments and let me know. I’ll geek out with you for as long as you’re willing! Alright so real quick, germination is when a plant begins growing after a period of dormancy. Put even more simply, it’s when a seed opens up and a plant begins to grow. There are only two things that are absolutely needed to start this process: moisture and darkness. As you might imagine, there’s more than one way to accomplish this. I’ve provided four methods below along with some tips to help you along.
- In A Cup Of Water: You may be thinking that since I put this one at the top of the list it must be my favorite. Well, you’d be wrong. It’s my least favorite and I wanted to tell you right from the jump. What you do here is fill a small cup with water, drop your seed in and place the cup in a dark place like a cupboard. All the necessary factors are present so what would could go wrong? Well, whatever it is happened every time I tried this method. Since it didn’t work for me (out of several tries) I can’t personally recommend it to you. Don’t get me wrong, that isn’t to say you shouldn’t try it if you want to. There are plenty of growers that swear by this method. I’m just not one of them. Especially when the next method works so well. Before I get to that though, I owe you a tip don’t I? If you’re not having much success, try adding a small amount of nutrient solution to your water. Or you could just try this next method!
- The Paper Towel Method: Since I started you off with my least favorite method I figured the least I could do is follow with the one I like the most. The paper towel method consists of wetting a paper towel and folding it in half. Then you place your seed on one side and fold it in half again, covering the seed. Finally, you put the paper towel in something to keep it from drying out and move everything to a dark place. Simple enough right? If you’re having trouble thinking of what to place your paper towel in, here’s a few ideas: a tupperware container, bowl with saran wrap over the top, or between two plates (one face down on the other). After that, place whatever you use into the cupboard or other dark place. What I use though, and this is my tip for this method, is a black DVD case. I just place the paper towel on the side opposite of where the disc would go (take that out of course) and lay it face down on top of my game console. Why the game console? The heat that is put off speeds up the germination process. Seriously guys, I’ve never had a seed not germinate using this method. Give it a try and see for yourself. Just be sure to check your seed daily cause the taproot will grow quickly.
- Rockwool Cube or Peat Pellet: Rockwool and peat pellets work in much the same way. You soak them in water until fully hydrated then place the seed below the surface. There really isn’t much more to this method; it’s pretty simple and straightforward. Also, you don’t have to worry about moving your freshly sprouted seed to your grow medium, risking damage to the exposed taproot. You can let the seedling grow until it’s roots come out the bottom and plant the entire thing as is. If you do decide to go this route then I recommend buying, or making, a humidity dome to place your cube or pellet in. Similar to placing the DVD case on a game console, you could place your dome on a heating pad to speed up the process.
- Directly In Soil: Good ‘ol dirt and water, just the way nature intended it! Assuming you’re growing in soil this is probably the easiest way to go. All you have to do is bury the seed about half an inch below the surface. It doesn’t get much simpler than that. The only tip I have for you on this one is to keep the soil moist but not soggy. You want enough moisture for germination to take occur but not so much that you drown the taproot after it emerges.
While I can’t personally recommend the first method (other growers can), I think any of the other three will work just fine for you. Don’t get discouraged if your first attempt doesn’t pan out Sometimes even healthy looking seeds are duds. It’s also important to keep in mind that this process can take upwards of 710 days so give it some time. If you find yourself several seeds in with no luck, pay close attention to how dry you’re letting it get or just try a different method.
Ok class, that’s all for today! If you have any questions, thoughts or just want to talk, I’ll meet you in the comments.


Hey this is my first time trying to grow my on and I kinda need some more tips can you help me please contact me